Schedule app updates to your iOS device
This article is for those who want to schedule a time for their app to be updated because they won’t be at a computer during the time they want it to update. We will outline the process for iOS here.
Option 1 – Supervised Devices Running App Lock
Prerequisites
- The iOS device must be in Supervised mode, attained through configuring the initial device setup through Apple Configurator
- The device must have two profiles with App Lock policies on them – one for the app that will be updated and another for a secondary app located on the device (The secondary app is used to force the app being updated into the background so it can be updated without user interaction on the device)
- The device must have a profile on the device that contains an App Lock policy
- Automatic Updates must still be enabled on the device (if you are attempting to update an app from the App Store)
Steps – See the video and article called Updating App on Supervised Devices for more information
- In Manager, go to the Actions tab

Select the Action Group you want to apply the sequence to, either All Devices or one you have created. See How to Create Action and Alert Groups
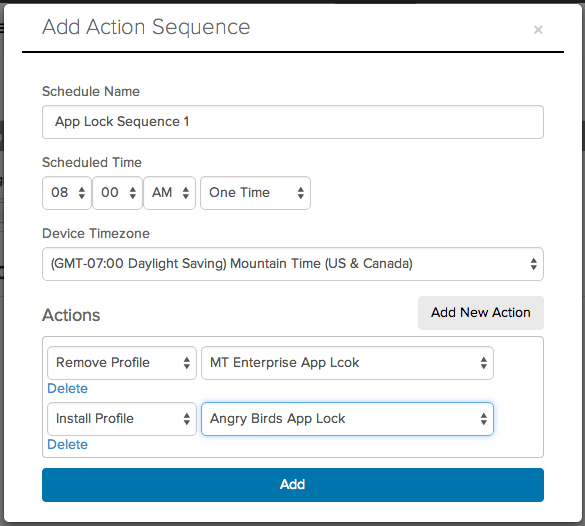
Click the Add New Sequence button and give the sequence a name

Select the time you want the app to be pushed, select One Time and click Add New Action
Select Remove Profile
Select the profile with the App Lock policy of the app you are trying to update (this profile should already be on the device as mentioned in the prerequisites
Click Add New Action
Select Install Profile
Select the profile containing the App Lock policy of the secondary app you want to lock the device into
Click Add
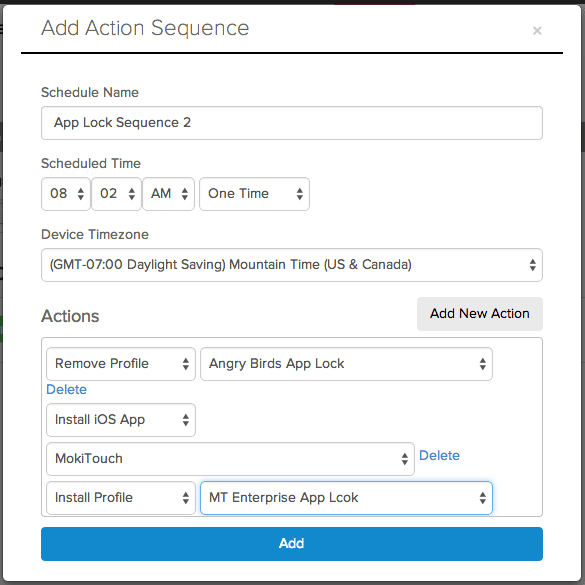
Click the Add New Sequence button again and give the sequence a name
Select the time a couple minutes after the first sequence ran, select One Time and click Add New Action
Select Remove Profile
Select the Profile that you installed in step 8
Click Add New Action
Select Install iOS App ( Steps 15-17 for enterprise apps only. If you are using an app from the App Store then skip to step 18.)
Select the app you want to push to the device
Click Add New Action
Select Install Profile
Select the profile with the App Lock policy of the app you just updated, thus locking it back into your newly updated app
Click Add
- In Manager, go to the Actions tab


Option 2 – Unsupervised device
- In Manager, go to the Actions tab

- In Manager, go to the Actions tab
- Select the Action Group you want to apply the sequence to, either All Devices or one you have created (See Manager Tour 9 – Actions tab for info on Action Groups)
- Click the Add New Sequence button and give the action sequence a name

- Select the time you want the app to be pushed, select One Time and click Add New Action
- Select Install iOS App
- Select the app you wish to send to the device
- Click Add
- The next person to come to the app will be presented a pop-up asking if they would like to install the update. If this is a Store app they will need to accept and enter the iTunes password to finish the installation
