How to manage Accounts in the Partner Portal
Managing your accounts in the Partner Portal is easy to do. Here we’ll explain the options that are available for the account creation and billing side of things, as well as the support side of things.
Step 1: Manage Account Subscription Information
Once you have created an account it will show up in the account list, as shown in the image. When you click on an account you now have access to the Actions drop down as well as account details on the right of your screen. By default all accounts are created as Active Subscribers and will have full access until you change the Status on the right to Cancelled/Disabled and hit Save. To give a client a demo with an expiration date follow these steps:
- Create the account
- Select the account
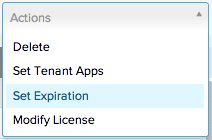
- Click on the Actions drop down and select Set Expiration

Choose the date you want the account to expire

Hit the Modify Expiration button
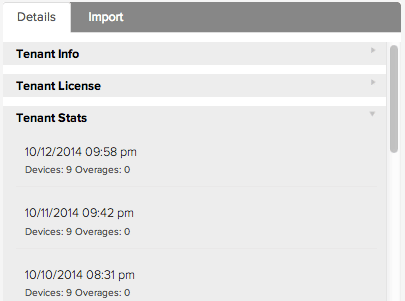
When the expiration date is set on an account it will show up in the Tenant License box under the Details tab on the right of the screen. Once the expiration date passes the Status will change to Expired and no commands can be sent to the devices.

You can remove an expiration date at any time. If you wish to remove the expiration date follow these steps
- Select the account
- Click the Actions drop down and select Set Expiration
- Click the Remove Expiration button (Gray button in the screenshot higher up the page)
- If the expiration date has already passed (as per the example above) then you’ll need to change the Status back to Active in order for commands to be sent to devices again
Step 2: Send Device Management Information to New Account Admins
We have created a few partner specific articles to send to your iOS and Android users. Because APNS needs to be setup for iOS devices to be enrolled you’ll need to send an account admin invite to anyone using iOS devices, then follow that by sending them a link to the Initial Requirements for iOS Setup article and let you know when it is complete. You will only need to send the other articles if you plan on giving users access to their account so they can attempt to monitor and troubleshoot devices on a daily basis. These articles assume that you, the partner, will be handling the device enrollment. The information contained in these articles is generic to the Moki Total Control (MTC) platform and type of OS. Any specific instructions due to the agreements you have with your accounts is left to you to educate them on. This includes, but is not limited to, ordering practices, shipping details, setup instructions when they receive their device and what they are allowed to do and see within MTC. Feel free to create your own specific guides. You can even copy from any of our existing articles if it helps. Just visit support.moki.com and poke around.
- Initial Requirements for iOS Setup – Must send to client for initial setup before you can enroll iOS devices
- Monitoring iOS Devices – Send to iOS users who want to log in to their account and review their devices
- Monitoring Android Devices – Send to Android users who want to log in to their account and review their devices
- Full Product Feature Set – Send to any user that wants to understand the full range of MTC functionality
Step 3: View Account Stats and Activity
After you or your accounts have enrolled devices you’ll be able to view their device statistics and app activity level from within the Partner Portal. There are three locations where this information is kept
- Tenant Stats – Located in the Details tab on the right of the screen
- Stats – Button located in the Actions bar
- Activity – Button located in the Actions bar
- Export Action History – Button located in the Actions bar
Section 1 – Tenant Stats
To access the Tenant Stats do the following steps:
- Click on an account
- Look to the right in the Details tab
- Click on the Tenant Stats section, third section down

There will be a record for every day since the creation of the account, whether or not any devices are enrolled. This will count the highest number of devices enrolled in MDM or an app. This number will also correspond with the Devices column in the Stats page you will read about in the next section. The Overages section should not be worried about as it is a field for Moki to look at.
Section 2 – Stats
To access the account’s Stats
- Click on an account
- Click the Stats button in the Actions bar

This will return the following interface

By default the current day’s stats are returned. Below are the field’s and their meanings
- Contracted Devices – The number that Moki has on file for that account. If we don’t have anything on file it will be 0. Moki doesn’t require this number
- MDM Devices – The number of devices currently enrolled in MDM. If a device has had MDM removed it will be in your device list but won’t show up here
- AEM/ASM Devices – The number of devices enrolled in a tenant app, such as MokiTouch 2, MokiManage Android or another app with the MokiManageSDK embedded. These devices can be independent from MDM devices
- Preregistered Devices – The number of devices that have been preregistered into that account. Typically this occurs when devices are purchased from an OEM provider
- Devices – Total number of unique device records our system creates. This will not match a total of the MDM and AEM/ASM categories because we have several apps they could be enrolled under and one device could be enrolled in MDM and two apps such as MokiTouch 2 and MokiManage Android.
- Overages – The number of devices over the Contracted Devices number. This is the difference between the Devices number and the Contracted Devices number
- Pending Actions – The rolling number of actions sent to devices that are still listed as pending (such as app installs or restarts, etc.). The number is rolling for the month. Actions that are still Pending after 20 minutes will need a manual refresh attempt within the Action History to update it’s status.
- Completed Actions – The rolling number of actions sent to devices that have successfully completed. The number is rolling for the month
- Failed Actions – The rolling number of actions sent to devices that have returned unsuccessful with an error message. The number is rolling for the month
Section 3: Activity
To access an account’s activity
- Click on an account
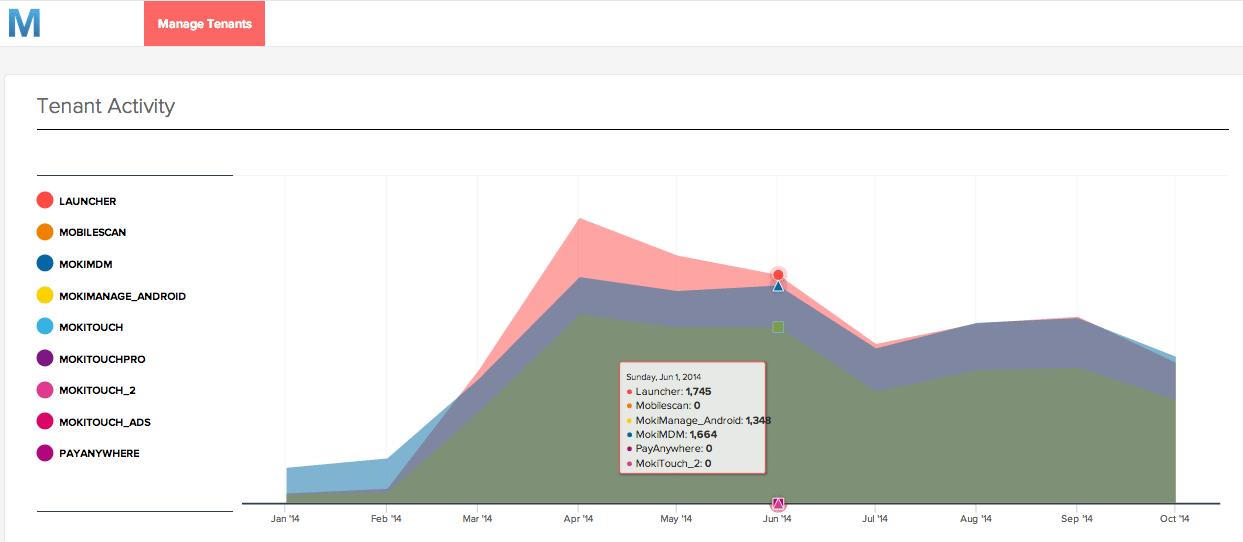
- Click the Activity button in the Actions bar (Third from the left, with the graph)

This will return the following interface

This displays a graph of the monthly usage of an app. To simplify the view, only have the apps you want to see active. An app is active on the graph if it has the circle next to it completely filled in. This graph will show the last twelve months of activity. The purpose of this is to give you an indication of the frequency that each app is being used. Note: This feature is currently in development and will be available shortly
Section 4: Export Action History
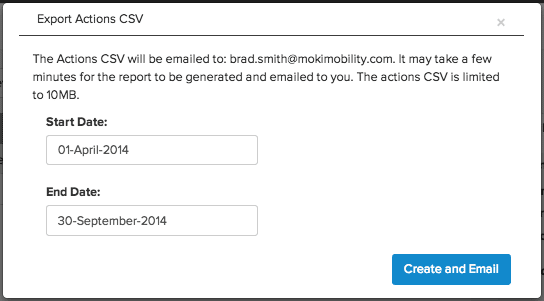
The partner admins have access to export an account’s complete Action History. Action History captures all actions sent to a device. MTC’s user interface only stores the 100 most recent actions sent on the account. Therefore, you’ll want to export this list to see the complete set of actions sent to that device over the life of it’s enrollment in MDM.
How to export the Action History
- Click on an account
- Click the Export Action History button

- Select your date range

- Select your date range
- Hit the Create and Email button
- Check your email. It will be the email account associated with your login credentials
What is returned in the Action History CSV file

- CommandUUID – The ID of the device or how we track it in MTC
- Action – What action was sent to the device
- Status – Says whether the action was completed, if the message (action) has been sent but unresponded to or failed
- LastSeen – The day and time the device last checked in with MTC
- App – The app that sent the action to the device
Step 4: Unlocking an Account
Very rarely an account admin will start clicking around in their Account Settings and limit access to their account to certain IP Addresses. This effectively locks anyone who isn’t on that IP out of the account. If this happens you can remove those IP’s from right here in the Partner Portal without needing to log in to their account.
How to Remove Whitelisted IP’s
- Click the account
- Click the Details tab on the right
- Extend the top section called Tenant Info and scroll down to the bottom of the section
- Click the Remove Whitelisted IP’s button

- They will need to refresh their browser and they should have access once again
Choose your next step
This covers the basics of the Partner Portal and how to manage your accounts. If you still haven’t enrolled devices it’s time to start.