Make sure you find yourself in the Agent platform.
Click on the Profiles tab, then find the New Profile button.
You will then be presented with a drop-down. Click on the Philips Profile option. You may also click on the Philips Profile Tab across the top of the screen.
The options for the Philips profile will be presented allowing you to modify your Profile. When you are satisfied with your Profile simply click Save on the bottom left-hand side of the screen.
Philips Profile Options:
Profile Name– Enter the name of the Profile.
Enable Admin Password– Allow a user to set the 4 digit pin to be used on the device. The password length can only be 4 digits (numbers only), nothing longer, and nothing shorter.
Admin Mode Enabled– Allows a user to control if the device is in Admin Mode. If Admin mode is turned on it allows the password to be bypassed on the device.
Ethernet Enabled– This feature allows you to control whether the device has access to use an Ethernet connection.
NOTE:The Philips Profile can also be applied to devices in bulk using an Action Sequence. For Information on how to run an Action Sequence click here.
Export/Import Settings
Exporting and Importing settings allows a user to clone the Settings and Apps from one device onto other devices. This allows you to clone the setup from one device onto another, or multiple others with ease.
How to Export Settings
Find yourself in the Agent platform and click on the Devices tab across the top of the screen.
Select the desired device from the list to perform the Export Settings action.
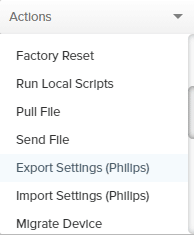
Find the Actions drop-down to the top-right of the device.
Click on it and you will be presented with multiple options. Scroll down until you see “Export Settings (Philips)”.
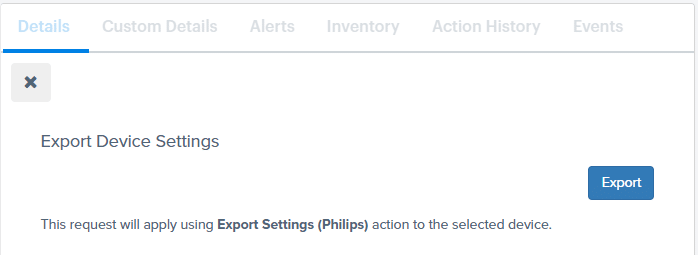
Click on “Export Settings (Philips)” option and then the Export button to confirm.
To find the exported file, select the Action History Tab for that device. Find the “Export Settings (Philips)” action. Refresh the Action History until you see the action display Completed. Once it is Completed, click on the Action and it will open displaying an option to download the exported file.
How to Import Settings
NOTE:When Importing a file you must make sure that you have uploaded the file into Moki before you are able to push the file onto the device. Upload it as an Other File Type under the Files tab.
Find yourself in the Agent platform and click on the Devices tab across the top of the screen.
Select the desired device from the list to perform the Import Settings action.
Find the Actions dropdown.
Click on it and you will be presented with multiple options. Scroll down until you see “Import Settings (Philips).”
Click on “Import Settings (Philips)” and you will then be presented with a screen allowing you to import the desired settings.
Select the settings file to import from the dropdown.
Select Import Settings to confirm the selection.
NOTE: The Import Settings action can also be applied to devices in bulk using an Action Sequence. For Information on how to run an Action Sequence click here.
SICP Commands
Learn more about Philips SICP Commands and how to create any command here.
Philips devices allow for custom actions utilizing SICP commands. Moki has some default SICP commands built-in, while also giving users the ability to utilize any custom SICP command as well.
SICP Commands Options:
Set Power On
Set Power Off
Set Mute On
Set Mute Off
Set Input Source HDM1
Set Input Source HDMI2
Set Video Source
Set Volume
Custom Command
Some SICP Command options will require an SICP code to be entered once the option is selected. These are:
Power Off: Depending on the power settings on the device, this will determine if the device powers off or locks itself.
WARNING:Depending on the device's power settings, this action will either completely power off the device, or put it to sleep. If the device is completely powered off using this command, the device will have to be manually turned back physically on the device due to the loss of connection to Moki.
Volume: For all SICP commands regarding volume levels, you must type in the SICP command code to determine the volume level on the device.
Set Video Source: For any video source option other than HDMI1 or HDMI2, the SICP command code will need to be entered to determine which video source is to be used.
Custom Command: You are able to put any SICP command code here.
NOTE:All SICP Commands can also be applied to devices in bulk using an Action Sequence. For Information on how to run an Action Sequence click here.
This website uses cookies to improve your experience. We'll assume you're ok with this, but you can opt-out if you wish. Accept Read More
Privacy & Cookies Policy
Privacy Overview
This website uses cookies to improve your experience while you navigate through the website. Out of these cookies, the cookies that are categorized as necessary are stored on your browser as they are essential for the working of basic functionalities of the website. We also use third-party cookies that help us analyze and understand how you use this website. These cookies will be stored in your browser only with your consent. You also have the option to opt-out of these cookies. But opting out of some of these cookies may have an effect on your browsing experience.
Necessary cookies are absolutely essential for the website to function properly. This category only includes cookies that ensures basic functionalities and security features of the website. These cookies do not store any personal information.
Any cookies that may not be particularly necessary for the website to function and is used specifically to collect user personal data via analytics, ads, other embedded contents are termed as non-necessary cookies. It is mandatory to procure user consent prior to running these cookies on your website.