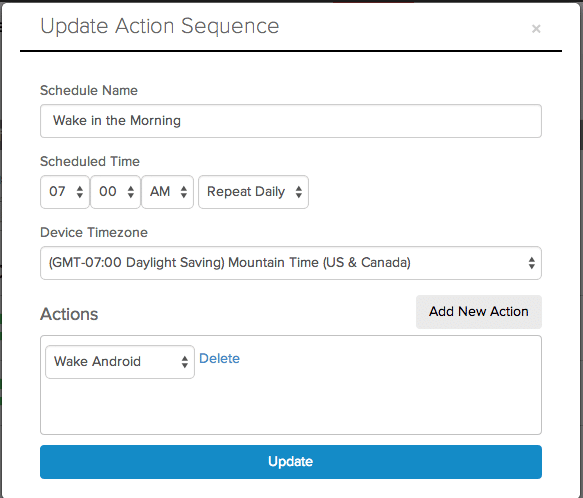
This tour shows you the possibilities available through the Actions tab
The Actions tab allows you to perform the actions available in the Devices tab at a designated time. They can either run once or repeat daily. This becomes useful when an action, profile or app needs to reach the device at a specific time and you won’t be available to do it yourself; or you need to lock the device down at night (after business hours) and wake it up in the morning (before business hours) and you don’t want to adjust your work schedule every day to accomplish this. There are also actions specific to MokiTouch 2 and apps with the Manager SDK embedded. There are three main sections to this tab, the Actions Bar, Action Groups and the Actions List.
1 – Actions Bar
The actions bar allows the creation and deleting of Action Groups

- + Icon – Allows the creation of an Action Group, which allow actions to be created for specific subsets of devices, as determined by tags. To learn more about tags refer to the article Manager Tour 8 – Tags Tab
- Creating An Action Group
- Give the Action Group a name
- Click in the text box below the Tags label and select the tags that will belong to this Action Group
- Hit the Create Action Group button

- Creating An Action Group
- + Icon – Allows the creation of an Action Group, which allow actions to be created for specific subsets of devices, as determined by tags. To learn more about tags refer to the article Manager Tour 8 – Tags Tab
- Trash Can Icon – Deletes the selected Action Group
2 – Action Groups
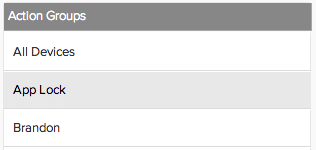
By default an All Devices category is created within the Actions tab. To setup actions for specific devices Action Groups need to be set up (follow the steps listed above). Once an Action Group has been created it will show up in this list. Only one Action Group can be selected at a time. The selected Action Group will be highlighted in grey.
3 – Actions List
Once an Action Group is selected the Actions List is viewable. From here you’ll be able to create and edit the actions sent to this selected group. There are three sections you should know about.

- Tags – Click in the text box under label to edit the tags for this action group and hit the Save Tags button or the changes won’t be saved
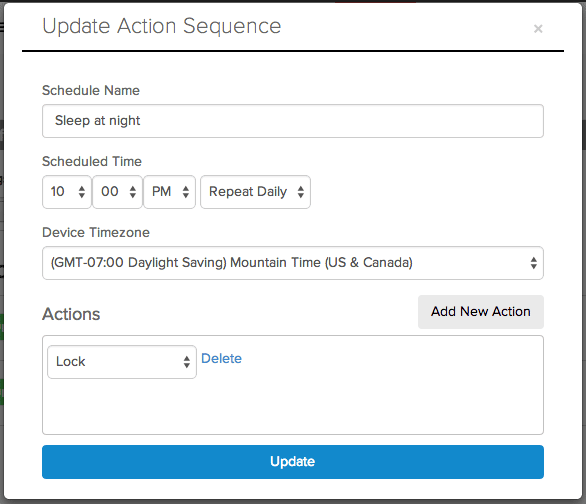
- Add New Sequence – This is what we click to add the actions. It is called Add New Sequence because we can schedule just one action or we can schedule several to fire in sequence. Here are the features you’ll see in the popup
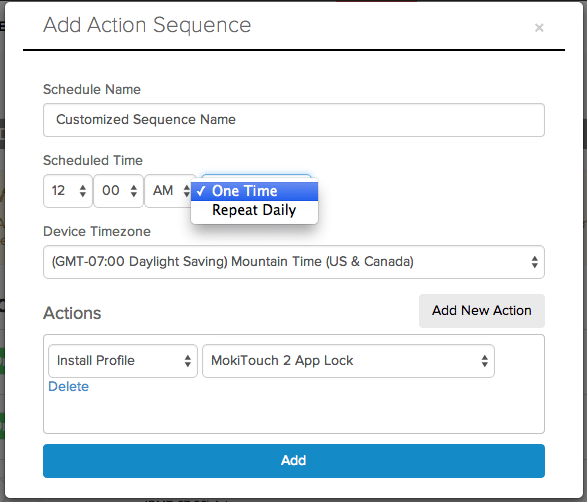
- Schedule Name – A name must be given in order to save the sequence
- Schedule Time – This is the time you want the device to fire, as well as the frequency. Currently we only support actions repeating daily or happening once
- Device Timezone – This will be the time the sequence starts, irrespective of where the device is. If you select 7:30 PM Eastern Time and your device is in California, the person in California will see the actions take effect at 4:30 PM Pacific Time
- Add New Action – Click this button to see add a new action to send to the device(s). You’ll notice that these actions are all available to use individually on the Devices tab, however, the Devices tab only allows one action at a time, whereas we can make a whole sequence of actions that fire right after one another at a time of our choosing. Here are the available actions:
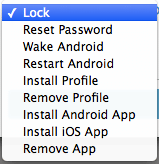
- Lock – Sends a lock or sleep command to your device
- Reset Password – If there is a password on the device it clears the password requirements, it does not allow you remotely set the password
- Wake Android – If the Android tablet is locked or sleeping it wakes it up as if you hit the sleep/wake button, if the device has a password it will still be required
- Restart Android – This will reboot the tablet. This action is frequently used after changing MokiManage boot settings
- Install Profile – It will send the iOS profile selected to the device. For a full list of available profiles see Manager Tour 5 – Profiles Tab. However, Scheduled Actions doesn’t recognize what devices you have selected for the sequence to apply to so it will allow you to select this action to apply to Android devices. Just know that the Android device won’t receive the command.
- Remove Profile – Specific to iOS devices only. It will remove the chosen profile if it is on the device.
- Install Android App – This will give you a list of all the Android .APKs listed in your Apps tab. This will install the app and place it in your available apps
- Install iOS App – This will give you a list of all the iOS apps listed in your Apps tab. If the app is available in the App Store then the user will still need to enter the Apple ID credentials. If it is an update to an enterprise app already on the device it can be installed on the device without any user interaction. If the device is in App Lock mode, the App Lock profile will need to be removed before this action takes place.
- Remove App – This will remove any Managed app, meaning that the app was pushed to the device from Manager. If the app was downloaded directly from the device it cannot be removed by this action
- Actions – This lists al the actions scheduled in this sequence. The actions will fire in this order starting from the top. When this action is completed successfully the next action in the list will fire. If an action comes back with an error the rest of the actions will not fire. This is to prevent actions from firing that are dependent on conditions being present on the device. For example if the device failed to install an app you wouldn’t want to install the App Lock profile for that app or the device would freeze with an error message on it. The only exception to the sequence stopping for an error is when there is an error to install an app that says the app is already on the device. We don’t stop the sequence because the desired result existed. Drag and drop to change the order of the actions
- Schedule – Displays all the action sequences that have been created for this Action Group. The On button will stay on even after an action has completed and can be turned to Off at any time. The app name, date or frequency, time and number of actions is also displayed. From here you’ll be able to delete an action sequence entirely or edit an existing one to reflect a new date and time.

4 – Frequent Scheduled Action Examples
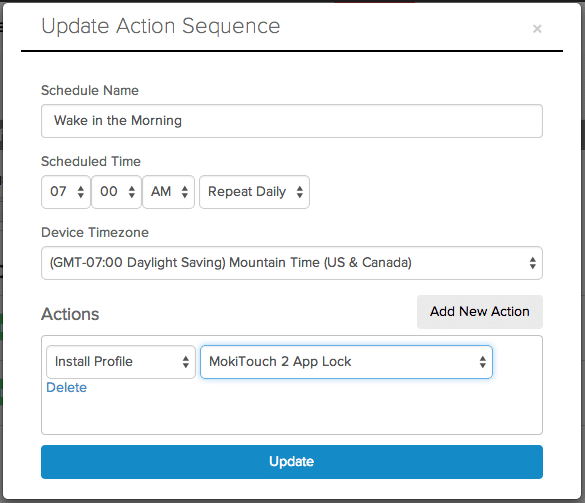
Example 1 – Night Mode for iOS
Prerequisites:
- The iOS device must be in Supervised mode, attained through configuring the initial device setup through Apple Configurator
- The device must have an App Lock policy assigned to a profile. See Manager Tour 5.6 – App Lock Policy for more information
Steps
- Select the Action Group you want to apply the sequence to, either All Devices or one you have created
- Click Add New Sequence and give it a name
- Select the time you want the device to go to sleep, select Repeat Daily and click Add New Action
- Select Lock
- Click Add

- Click Add New Sequence again and give it a name
- Select the time you want the device to wake, select Repeat Daily and click Add New Action
- Select Install Profile
- Select the profile that contains the App Lock policy you want to lock the device to
- Click Add

Example 2 – Remotely Updating Apps for iOS
Prerequisites
- The iOS device must be in Supervised mode, attained through configuring the initial device setup through Apple Configurator
- The device must have two profiles with App Lock policies on them – one for the app that will be updated and another for a secondary app located on the device (The secondary app is used to force the app being updated into the background so it can be updated without user interaction on the device)
- The device must have a profile on the device that contains an App Lock policy
- Automatic Updates must still be enabled on the device (if you are attempting to update an app from the App Store)
Steps – See the video and article called Updating App on Supervised Devices for more information
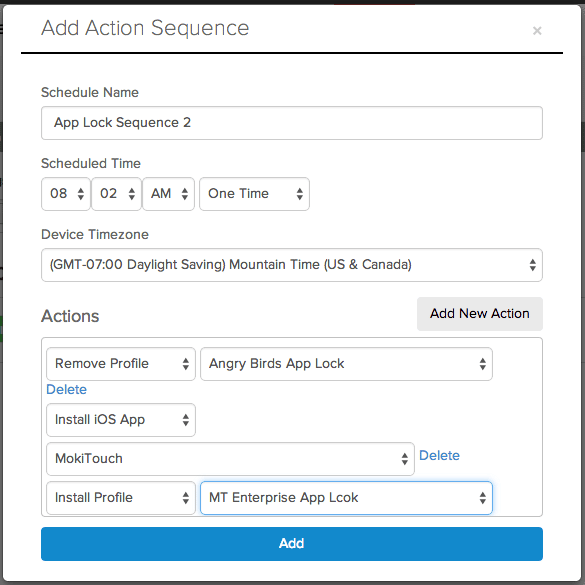
- Select the Action Group you want to apply the sequence to, either All Devices or one you have created
- Click Add New Sequence and give it a name
- Select the time you want the app to be pushed, select One Time and click Add New Action
- Select Remove Profile
- Select the profile with the App Lock policy of the app you are trying to update (this profile should already be on the device as mentioned in the prerequisites
- Click Add New Action
- Select Install Profile
- Select the profile containing the App Lock policy of the secondary app you want to lock the device into
- Click Add

- Click Add New Sequence again and give it a name
- Select the time a couple minutes after the first sequence ran, select One Time and click Add New Action
- Select Remove Profile
- Select the Profile that you installed in step 8
- Click Add New Action
- Select Install iOS App ( Steps 15-17 for enterprise apps only. If you are using an app from the App Store then skip to step 18.)
- Select the app you want to push to the device
- Click Add New Action
- Select Install Profile
- Select the profile with the App Lock policy of the app you just updated, thus locking it back into your newly updated app
- Click Add

Example 3 – Remotely Updating Apps for Android
Prerequisites
- The app you are trying to update cannot be installed from the store
- The app must have originally been sent to the device from Manager
Steps
- Select the Action Group you want to apply the sequence to, either All Devices or one you have created
- Click Add New Sequence and give it a name
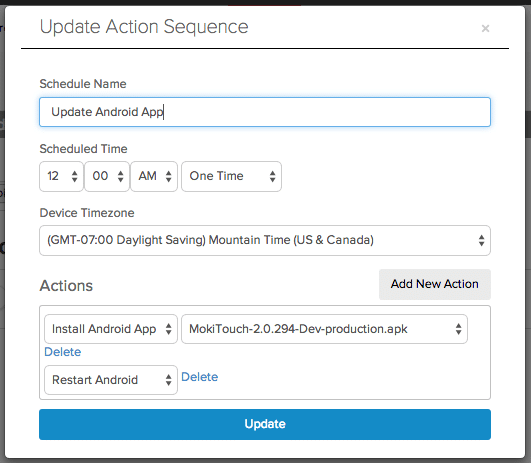
- Select the time you want the app to be pushed, select One Time and click Add New Action
- Select Install Android App
- Select the app you wish to send to the device
- Click Add New Action
- Select Restart Android
- Click Add
Example 4 – Daily Restart for Android
- Select the Action Group you want to apply this sequence to, either All Devices or one you have created
- Click Add New Sequence and give it a name
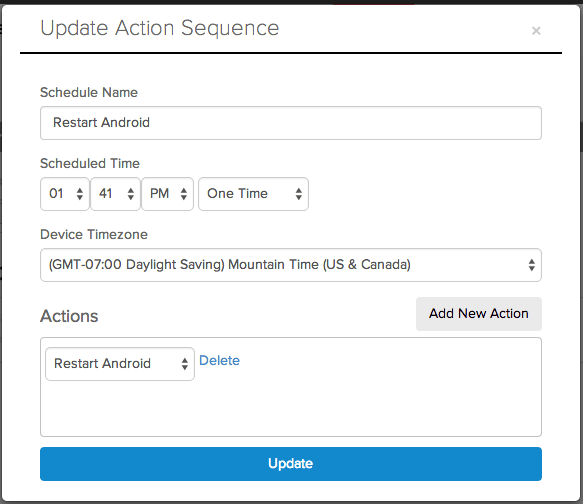
- Select the time you want it to restart, select Repeat Daily and click Add New Action
- Select Restart Android
- Click Add
Example 5 – Night Mode for Android (Lock the device each night and wake it in the morning)
- Select the Action Group you want to apply the sequence to, either All Devices or one you have created
- Click Add New Sequence and give it a name
- Select the time you want the device to go to sleep, select Repeat Daily and click Add New Action
- Select Lock
- Click Add
- Click Add New Sequence again and give it a name
- Select the time you want the device to wake, select Repeat Daily and click Add New Action
- Select Wake
- Click Add
