What is Launcher and when would you use it?
Launcher is an Android app that allows you to control what shows up on the home screen when the device boots up or the Home button is pressed. Here are some of its uses.
- Allows for custom backgrounds, custom app icons, app icon size, and text options
- Custom home screen is comprised of apps and web links
- Launcher options are controlled from within Moki’s web portal
- Allows access to device settings by use of a password
- Needed if you want to lock the tablet down to a small selection of apps
You can always download the latest version of Moki Launcher at mo.ki/launcher
Step 1 – Installing Launcher
Launcher is already in your account so you can include it in your enroll code. Or you can send it to your device from the Devices tab by selecting your device, clicking drop-down that says Apps and selecting Launcher.

Once Launcher is installed on your device it will launch on your screen and show up in your apps menu with this icon,
Refresh your browser and reselect your device. You will now see Launcher listed as an enrolled app in the device’s Details tab where you can modify the settings.
Step 2 – Launcher Settings
- To start managing settings, click the Manage Settings button

- Then the Edit Device Settings button.
- When you have finished editing settings hit the Save button.
Launcher settings are composed of sections. The first section is Security, which controls access to the on-device settings menu. The second section is the weblink settings. The third section is for the home screen pages called Application Pages. The fourth section is for running a screensaver through the device’s Daydream functionality. The Application Pages section is where you will do the bulk of your work as it is the place where you upload a custom background image, choose how many pages of apps you’ll have, what apps you’ll have on what pages and what their icons and app name will be. Here are the settings options and their definitions.
1 – Security
- Password – Restricts access to the settings which are accessed by pressing and holding on the screen for 5 seconds
- Menu Accessible – Turns on or off the ability to get into settings on the device
- Show Device Info in Settings – Shows/hides the Device Info section displaying the device name, serial number, and UDID in the app settings locally on the device
2 – Widgets (Available on Launcher versions 2.6.0+)
- Enable Clock Widget – Turn On or Off the visibility of the clock widget on the Launcher desktop
- Clock Position – Set clock position to Top Center, Horizontal Center, or Bottom Center
- Enable WiFi Widget – Turn On or Off the visibility of the WiFi widget on the Launcher desktop
- Enable Battery Widget – Turn On or Off the visibility of the battery widget on the Launcher desktop.
3 – Web Page Settings
Only applicable if you use a Web Link
- Home Page URL – If the home button is turned on below then this is the URL that will be loaded when the home button is pushed
- Home button, refresh button, address bar, back button, forward button – Show or hide these features within the weblink browser
4 – White Listed Web Pages
If you want to allow any websites that your Web Links have links to you’ll need to include these in the whitelist.
5 – Application Pages
Click Add New to access apps and add a page of apps. There can be multiple pages (windows) of apps. Here is a view of the application page and adding an application

6 – Added Applications
Click the Add New button to add an app or web clip.
- Application Name – Selection of apps that are on the device or you can choose Web Link. All apps loaded onto the device will be available.
- Custom Logo – Upload your own custom logo file for the app, or put in a URL for the image. Yes, this means you can even replace the MokiTouch 2 app with your own logo 🙂 If you don’t select an image then the default image for the app will be used. If you select a Web Link then the default image is the Launcher icon
- Web Link Title – The name that shows up underneath the app or Web Link. Yes, this means you can even replace the words MokiTouch 2 underneath the app :).
- URL (for weblink) – If you selected the Web Link from the Application Name menu then this is the URL the Web Link will go to when opened.
There is a numbered order to the apps that can be changed by dragging and dropping them.
7 – Screen Saver (NOT Available on versions of Launcher 2.6.0+)
For the screensaver to work you must turn Daydream on in settings and set it to run Launcher. You’ll also want to check the Daydream options to make sure it will run when charging or docked
- Start After – The elapsed time before the screensaver will kick in, this must match your Daydream settings
- Content (Video or Image URL) – You can upload a file from your computer or just use a URL that goes directly to where the video is hosted. NOTE: Your screensaver must be a web standard file format including any of the following: .mp4, .webm, .png, .jpg, or .gif.
Step 3 – Setting the Device to Boot into Launcher
When you hit the home button on the device you’ll get the option to use the native Android app as the home screen or use Launcher as the home screen. Choose Launcher and Always when you are ready to roll. This will cause the device to boot into Launcher when the device powers on.
Step 4 – Save your settings for later use
After you have your device set the way you want, follow these steps to save these settings to apply to other devices in the future.
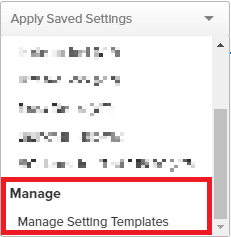
- With your device still selected, click the Manage Settings button then click the drop down that says Apply Saved Settings

- Select Manage Settings Templates.

- Click the Create New Template button
- With your device still selected, click the Manage Settings button then click the drop down that says Apply Saved Settings

- Give the template a name and hit Save

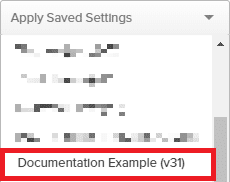
- The new template will show up in your Apply Saved Settings drop-down

Step 5 – Apply your Saved Settings to the rest of your devices
You can apply one device at a time by selecting the device in the Devices tab, clicking Manage Settings and selecting the Saved Template. Or, you can apply them to the entire fleet at one time from the Device Groups tab. Refer to our articles on each of these topics.
NOTE: When updating to a new version of Launcher, all Settings Templates will need to be updated as well in order to be able to be used on devices with the new version of Launcher.
Apply an App’s Saved Settings from the Device’s Tab
Using Device Groups to Apply an App’s Saved Settings
Create and Edit Templates from the Apps Tab
Additionally, you can create and edit templates from the Apps tab.
- Navigate to the Apps tab across the top
- Select the Enrolled Apps folder at left
- Find Moki Launcher in the list of Enrolled Apps and select the Manage Setting Templates button
- At this point you can edit or create settings templates the same way as described in Step 4 above
