This tour will show what is contained in the device list
The device list will show you all the devices enrolled in MDM. Both Android and iOS devices will display in this list. By default the device list will display up to 100 devices and is sorted with the most recently seen device first in the list. To see more devices you’ll need to scroll to the bottom of the list to load the next 100. You can also use the filters to find specific devices quickly, refer to the article, Manager Tour 3.4 – Searching and Filtering Devices.

Available Fields
By default only five fields are displayed, with two additional options that can be swapped in through the Table Manager in the Actions Bar. The last three sections are always enabled. Here are the following Table options.
* Accessible in the Table Manager. See the article Manager Tour 3.3 – Actions Bar for more info.
Select All Box
The select all box allows you to select and deselect all devices in order to apply actions in bulk. If you want to select only a few devices you can simply click the box next to each device and a check mark appear next to each selected. If you choose the select all box and attempt to push an action, the confirmation pop-up will ask you if you want to send the action to just the 100 on the screen (if you have 100 or more) or to all the device in your account. The maximum number of devices you can push an action to is 500, therefore if your account has more than 500 devices you will be asked to reduce your selection as shown in the following screenshot.

1 – Device Name
The device name comes from the device. In cases where there is no device name, such as on Android devices, we use the last six digits of the MAC address. This name can be edited within the Manager interface. Edits only apply to the Manager interface and do not send any information back to the device. You can edit the device name by selecting your device in this list and looking under the Details tab on the right. Click in the field where your device name is and change the name, making sure to hit Enter when you are done to save the changes (see screenshot). This name will now be retained in Manager regardless of whether it is changed on the device or even unenrolled and enrolled again later (even if the name changed on the device in between enrollments).

2 – Model
This is the model of the device.

3 – OS
This is the OS the device is running. It will also include an icon for the type of device it is, iOS or Android.

4 – Battery
This is battery level from the last time the device checked in. This displays within a battery icon. To get the exact battery percentage you will need to select the device and look under the details tab on the right.


5 – Last Seen
When a device is enrolled in MDM it “checks in” with Manager, we call this the Last Seen time. After enrollment we will ping the device every hour to get it’s vitals, such as battery level, WiFi SSID it is using, available space, operating system, apps and profiles on the device. You can manually check this information and see if the device can be reached, thus updating its Last Seen time by sending it a refresh action as discussed in the Manager Tour 3.3 – Actions Bar article. If the device can be reached then the Last Seen time will update. Sometimes you will see that a device has not been seen for more than an hour. This means that on the last ping(s) we were not successful in reaching the device. This may be a cause to check the network the device is using, make sure the device is plugged in, is turned on, the router is connected or a host of other common reasons why a device cannot connect to WiFi or traffic is not able to get through to a device on a network. To make sure that the network is setup to communicate with Moki refer to this article on Network Requirements. If you are using the checked-out filter in your device list and you have devices that are only enrolled in an app you will see that the Last Seen time has not been updated since enrollment, this is because this is the record for the app enrollment and this device list is for MDM and only updates the MDM section.

6 – Enroll Date
The enroll date is the date the device was enrolled in Manager. This will not update but will be a static display field. If a device was only enrolled in an app and not in MDM it will not show up in this list, unless you have used a filter to show checked-out devices. In which case the Enroll Date will show N/A, which means that it was never enrolled in MDM.

7 – MAC Address
This is the MAC address of the device. This information is also in the device details.

What the device list can do
- Sort – The list can be sorted by each of the named categories A-Z or Z-A. Sorting will only sort the visible devices. Tip for those with more than 100 devices – If you click on the category you want to sort before you load all your devices then the new devices that are loaded will sort automatically as you continue to load
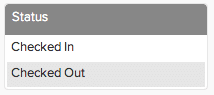
- Checked-in/Checked-out Status – If a device is enrolled in MDM it will show up in dark text, if the device has become unenrolled it will show up in light text. Checked-out devices are only visible if you have clicked the Checked-out filter on the left.


- Jump to Device in an App – If a device is enrolled in one of our apps then you should see a Jump-To icon. When you click it you will see the apps it is enrolled in. If you click one of the apps it will take you directly to that device
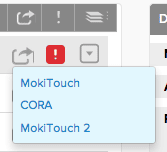
- Jump to Device in an App – If a device is enrolled in one of our apps then you should see a Jump-To icon. When you click it you will see the apps it is enrolled in. If you click one of the apps it will take you directly to that device

- Show Alerts – If you have alerts configured then if a device triggers an alert you will see either a yellow exclamation icon or a red exclamation icon. To configure alerts see the article Manager Tour 7 – Alerts Tab. Hovering over the alert will enlarge a pop-up box telling you what the alerts are.
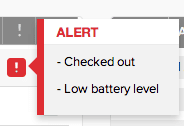
- Show Alerts – If you have alerts configured then if a device triggers an alert you will see either a yellow exclamation icon or a red exclamation icon. To configure alerts see the article Manager Tour 7 – Alerts Tab. Hovering over the alert will enlarge a pop-up box telling you what the alerts are.
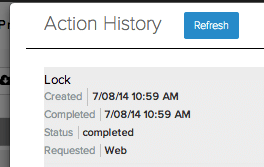
- Completion Status of Actions – Gives you a pop-up where you can see the last 50 actions that have been sent to the device